Miniature food has become very popular among dollhouse lovers, collectors, and DIY artists. One of the cutest and most satisfying miniature projects is making miniature cherry tomatoes. These tiny details can bring life and realism to a dollhouse kitchen, a miniature market scene, or even a tiny garden. In this guide, you’ll learn how to make miniature cherry tomatoes step by step using simple materials.
| Product | Buy |
|---|---|
| Air Dry Clay |

|
| Clay Tools |
|
| Clay Shaper Tool |
|
| Magnets |
|
| Jewellery Materials |
|
| Acrylic Colours |
|
| Paint Brushes |
|
Step 1: Preparing the Clay
Begin by conditioning the red polymer clay. Knead it well until it becomes soft and smooth. This step is important because well-conditioned clay prevents cracks after baking. For more realistic tomatoes, you can mix a tiny amount of yellow or brown clay into the red to avoid a flat, artificial color.
Step 2: Shaping the Cherry Tomatoes
Roll the clay into very small balls. Cherry tomatoes in 1:12 scale are usually about 3–5 mm in diameter. Try to keep the size consistent, but slight differences actually make them look more natural. Place the tiny balls on your baking surface, leaving space between each one.
Step 3: Adding Natural Details
Real cherry tomatoes are not perfectly smooth. Use a needle tool or toothpick to gently press a very small indentation at the top of each tomato where the stem would be. Be subtle—too deep will look unrealistic. This tiny detail makes a big difference in the final result.
Step 4: Making the Stems
Mix green clay with a tiny bit of brown to create a natural stem color. Roll extremely thin strands and cut very small pieces. Shape tiny star-like tops or simple stems and gently attach them to the tomatoes using light pressure. If needed, use a small drop of liquid clay for better adhesion.
Step 5: Baking the Miniatures
Follow the baking instructions on your polymer clay package. Usually, baking at 110–130°C (230–265°F) for about 15–20 minutes is enough. Let the tomatoes cool completely before handling them, as they will be soft while hot.
Step 6: Painting and Finishing Touches
This step is optional but recommended for extra realism. Use a soft brush to add very light shading with darker red or orange acrylic paint. You can also add a tiny highlight to mimic natural shine. Once dry, apply a thin layer of matte or satin varnish. Cherry tomatoes are not fully glossy, so avoid high-gloss finishes.
Step 7: Styling and Display
Now your miniature cherry tomatoes are ready! You can:
- Place them in a tiny bowl or basket
- Add them to a miniature salad scene
- Glue them onto vines for a mini garden
- Use them as props in dollhouse kitchen photography
Tips for Realistic Results
- Always work in good lighting to control size and details.
- Imperfection is your friend—nature is not perfect.
- Make extra pieces in case some don’t turn out as planned.
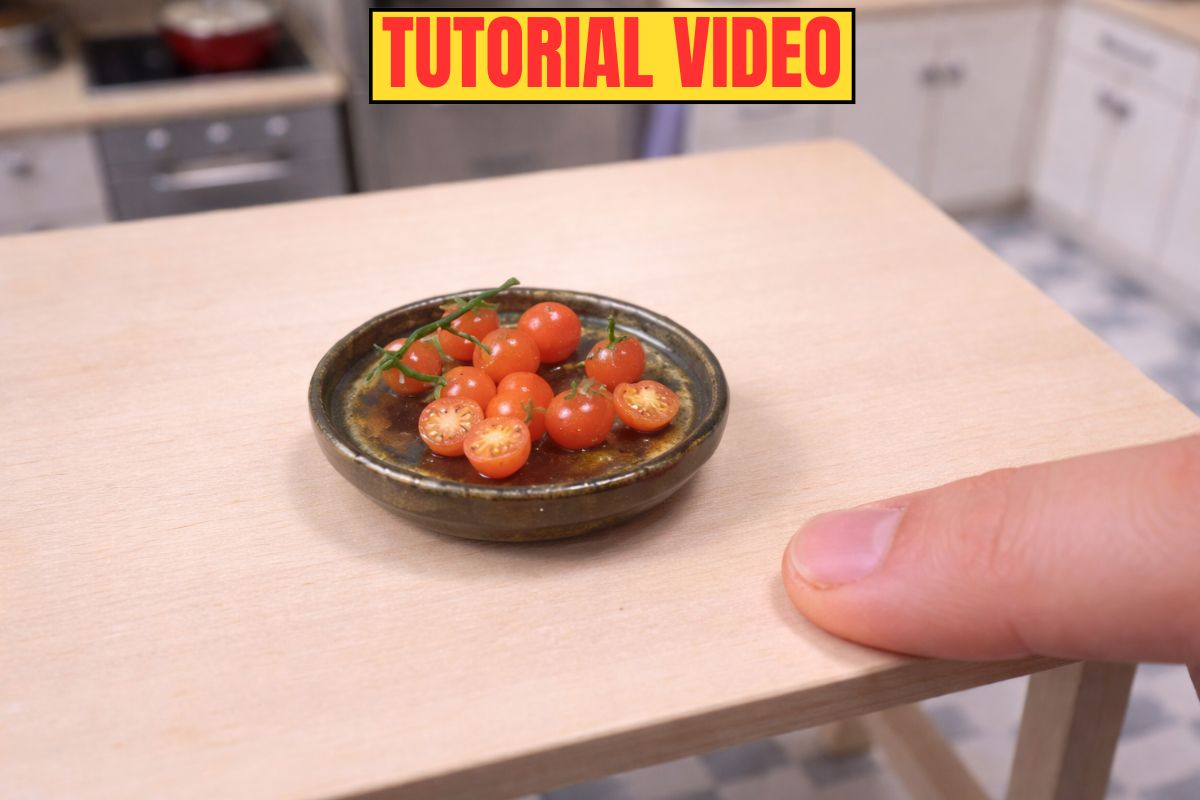
I found a video by a miniature food artist that demonstrates how to make miniature tomatoes step by step. The method may be slightly different from the one used here, but it is shared for learning and reference purposes. Exploring different techniques is always helpful for improving skills and gaining new ideas.
Conclusion
Making miniature cherry tomatoes is a fun and rewarding DIY project that adds charm and realism to any miniature scene. With simple tools, patience, and creativity, you can create tiny food pieces that look almost real. Whether you are a beginner or an experienced miniature artist, this project is a great way to improve your skills and enjoy the art of miniatures.