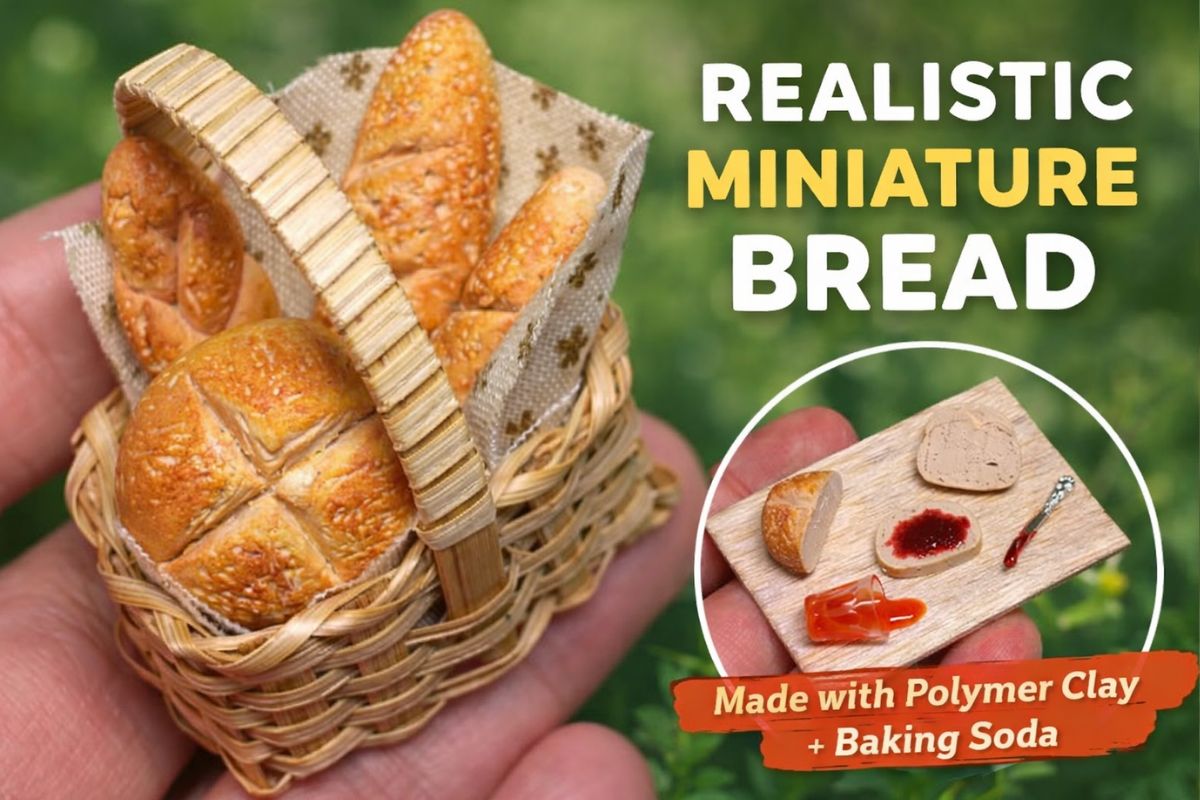
Creating realistic miniature food is one of the most satisfying parts of working with polymer clay. In this tutorial, you’ll learn how to make incredibly lifelike miniature bread using Primo Sculpey clay and a simple trick that adds authentic texture — baking soda.
Whether you’re a beginner or an experienced miniatures artist, this guide will help you level up your creations.
🧰 Materials You’ll Need
- White polymer clay (Primo Sculpey recommended)
- Brown polymer clay
- Baking soda
- Water
- Blade or craft knife
- Needle tool (or similar)
- Chalk pastels (for shading)
- Acrylic paint (yellow & brown)
- Glue (E6000 or Krazy Glue)
- Oven (for baking clay)
🎨 Step 1: Create the Perfect Bread Color
Start by mixing white polymer clay with a small amount of brown clay.
The goal is to achieve a soft tan or dough-like color, similar to real bread before baking. Take your time blending until the color is smooth and even.
🧪 Step 2: Add Realistic Texture (The Secret Trick)
In a separate container, mix baking soda with a little water.
Then gradually combine this mixture into your clay.
👉 Important tip:
The amount of baking soda you add will directly affect:
- The number of air holes inside the bread
- The overall texture
After mixing, your clay should feel:
- Slightly grainy (sandy)
- Slightly moist
This step is what makes your miniature bread look realistic when cut open.
🥐 Step 3: Shape Your Bread
Now comes the fun part — shaping!
You can create different types of bread, such as:
- Round sourdough (add a cross cut on top)
- Baguettes (with 2–3 diagonal slashes)
- Braided bread (roll and braid thin strands)
Feel free to take inspiration from real bakery designs or grocery store bread.
🔍 Step 4: Add Fine Details
Use a needle tool or blade to:
- Create surface texture
- Add cracks and imperfections
Then apply chalk pastels to shade your bread.
🎯 This step is crucial — it adds depth and brings your piece to life.
🔥 Step 5: Bake the Clay
Bake your miniature bread according to the instructions on your clay packaging.
⚠️ Note:
After baking, the colors may appear slightly lighter.
🖌️ Step 6: Enhance the Color
To make your bread even more realistic, lightly paint it using:
- Yellow tones
- Brown tones
This will give it that perfect baked, golden crust look.
🧺 Step 7: Create a Mini Scene
Take your project further by creating a small display:
- Slice the bread to reveal the textured interior
- Place it inside a tiny basket
- Add extra elements like:
- Jam (made with resin + pastel)
- A knife
- A glass of orange juice
- A small fabric cloth (for a picnic vibe)
🧷 Step 8: Assemble Everything
Arrange your miniature scene and glue all elements in place using strong adhesive like E6000 or Krazy Glue.
Take your time positioning everything until it looks natural and balanced.
✨ Final Result
You’ll end up with a beautifully detailed miniature bread scene that looks almost good enough to eat!
This technique is especially impressive because of the realistic interior texture, achieved simply by adding baking soda.
Watch this creator—they appear highly professional, and the final result is truly impressive. Their work demonstrates how dedication and creativity can elevate simple materials into something remarkable.
💡 Final Thoughts
Even if you’ve been working with polymer clay for years, this method offers a fresh and exciting way to improve realism in your miniatures.
Give it a try — you might be surprised at how much of a difference this simple trick makes!