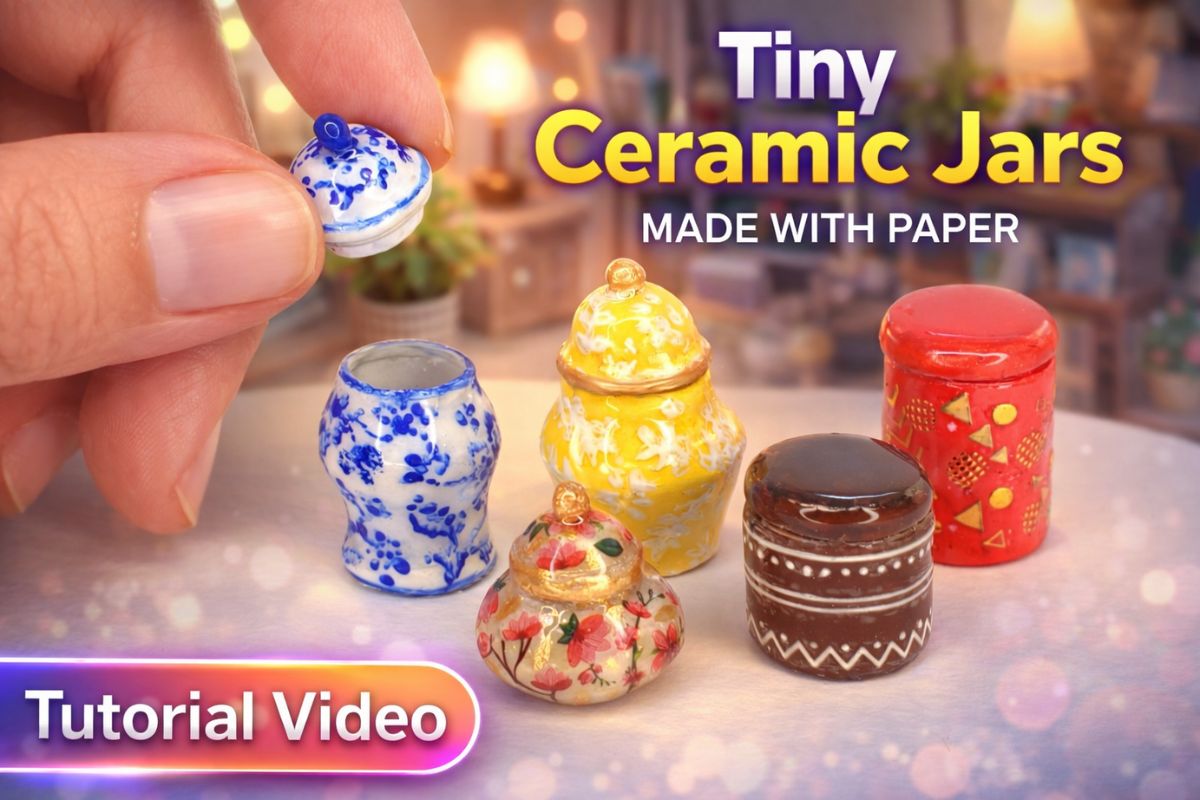
In the world of miniature crafting, creativity often begins with the simplest materials. One of the most surprising and satisfying projects you can try is transforming ordinary paper into stunning, ceramic-look jars for your dollhouse.
At first glance, these tiny creations appear to be made from real porcelain, but the truth is far more exciting—they’re crafted entirely from paper. This technique is not only affordable and beginner-friendly, but it also offers endless opportunities for customization and artistic expression.
The Magic of Paper Transformation
Paper is often underestimated as a crafting material. While it’s commonly used for drawings, origami, or basic DIY projects, it can also be shaped, layered, and refined into objects that mimic more expensive materials like clay or ceramic. The secret lies in layering, shaping, and finishing.
By carefully rolling and stacking strips of paper, you can create a solid structure that forms the base of your jar. With the addition of glue and sanding techniques, the surface becomes smooth and durable, closely resembling real pottery. This process is both relaxing and rewarding, making it perfect for hobbyists who enjoy hands-on creativity.
Step-by-Step Process
To begin, you’ll need a standard A4 sheet of paper. Cut a strip approximately 2 cm wide and about 15 cm long. This will serve as the foundation of your jar. Roll the strip tightly to form the base.
Next, prepare additional strips of paper. These should vary in width and length to help build the shape of the jar. For example, you might use a strip around 7.5 cm long and 1 cm wide, followed by slightly wider or narrower strips such as 9 cm, 8 cm, and so on. Gradually reduce the width of the strips as you build upward, with the final strip being extremely thin—around 1 mm wide.
Layer each strip carefully, wrapping it around the previous layer. This gradual layering allows you to control the overall shape, whether you want a rounded pot, a tall vase, or a wide jar. You can also add thin strips at the bottom and top to define the base and rim, giving your piece a more realistic and polished appearance.
Strengthening and Smoothing
Once the structure is complete, it’s time to reinforce it. Apply two to three layers of super glue over the entire surface. After each layer dries, gently sand the jar to remove any uneven edges or textures. This step is crucial, as it transforms the layered paper into a smooth, solid surface that mimics ceramic.
The combination of glue and sanding creates a hardened shell, making your miniature jar surprisingly durable. Take your time with this process—patience here will significantly improve the final result.
Painting and Finishing Touches
After sanding, apply a layer of white gesso. This acts as a primer, preparing the surface for painting and enhancing color vibrancy. Once the gesso dries, you can paint your jar using acrylic paints. Soft pastels, earthy tones, or even bold colors can bring your miniature to life.
To achieve a true ceramic or porcelain effect, finish with a glossy coat. UV resin is a popular choice because it creates a glass-like shine, but it must be handled carefully. Always avoid direct contact with your skin, as it can cause allergic reactions. Alternatively, a gloss varnish can provide a similar effect in a safer and more accessible way.
For added charm, decorate your jars with gold paint accents, silicone beads, or nail art stickers. These small details can elevate your design and make each piece unique.
Materials You’ll Need
This project requires simple and accessible tools:
- A4 paper (thin printer or copy paper works best)
- Watercolor paper (for sturdy bases)
- Tacky glue and super glue
- Acrylic paints
- White gesso
- Gold paint
- UV resin or gloss varnish
- Silicone beads or small decorative elements
- Nail art stickers or decals
- Scissors
- UV lamp (if using resin)
- Paint brushes
- Craft knife
- Ruler
- Marker pens, pens, and pencil
Most of these materials are inexpensive and easy to find, making this project ideal for beginners and experienced crafters alike.
Why You’ll Love This DIY Project
Creating miniature jars from paper is more than just a craft—it’s an experience. Watching a flat sheet of paper transform into a realistic, three-dimensional object is incredibly satisfying. The process encourages patience, precision, and creativity, all while producing beautiful results you can proudly display.
Additionally, this technique is highly customizable. You can experiment with different shapes, sizes, and finishes to match your dollhouse aesthetic. Whether you prefer rustic pottery or elegant porcelain, the possibilities are endless.
Watch this creator—they appear highly professional, and the final result is truly impressive. Their work demonstrates how dedication and creativity can elevate simple materials into something remarkable.
Final Thoughts
If you’re looking for a creative, affordable, and rewarding DIY project, these paper ceramic-look jars are a perfect choice. They prove that you don’t need expensive materials to create something truly impressive. With just paper, glue, and a bit of imagination, you can craft miniature treasures that look like they belong in a high-end dollhouse collection.
So why not give it a try? You might just surprise yourself—and everyone else—with what you can create from something as simple as paper.