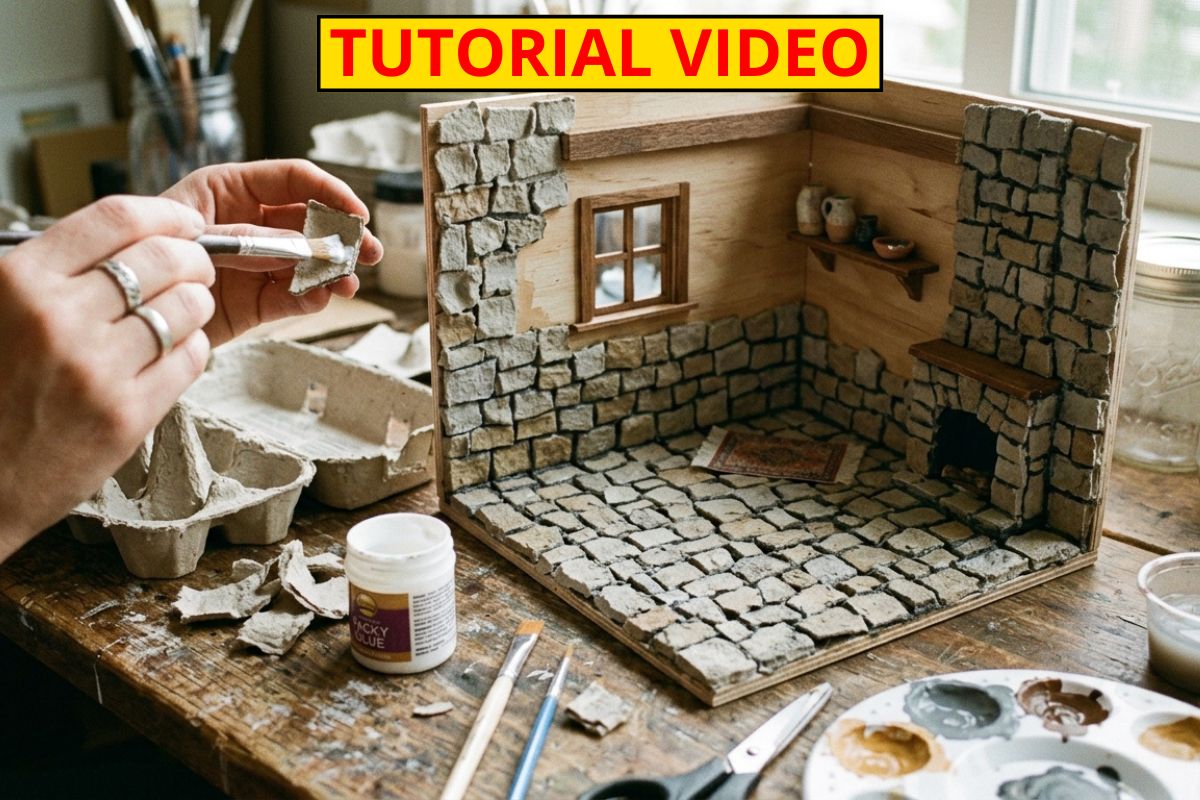
Creating a realistic stone floor or wall for a dollhouse or diorama doesn’t require expensive materials—just a bit of creativity and something as simple as an egg carton. This DIY technique is popular among miniature hobbyists because it produces a surprisingly authentic stone texture while being affordable, lightweight, and easy to customize.
Why Use Egg Cartons?
Egg cartons are made from compressed paper pulp, which naturally mimics the rough, uneven surface of stone. This makes them perfect for replicating miniature masonry. They’re also easy to cut, shape, and glue, allowing for full creative control over your design.
Materials You’ll Need
To begin, gather a few clean cardboard egg cartons, scissors, white glue, a paintbrush, acrylic paints (in shades like gray, brown, and black), and a sturdy base such as cardboard or wood. Optional materials include a craft knife, sponge, and matte varnish for sealing.
Preparing the “Stones”
Start by tearing the egg carton into small, irregular pieces. Avoid cutting perfectly straight lines—natural stone is uneven, so rough edges will enhance realism. These pieces will act as your “stones.” If you’re creating a wall, aim for slightly flatter pieces; for flooring, vary the thickness to create a more rugged look.
Assembling the Surface
Next, arrange the pieces onto your base. Play around with the layout before gluing anything down. Leave small gaps between each piece to represent mortar lines. Once satisfied, glue each piece in place using white glue. Press them down gently and let everything dry completely—this may take a few hours depending on how much glue you use.
Sealing and Strengthening
After the base layer is dry, it’s time to seal and strengthen the surface. Mix white glue with a bit of water (about a 1:1 ratio) and brush it over the entire surface. This helps harden the egg carton pieces and prepares them for painting. Let it dry thoroughly.
Painting for Realism
Now comes the most rewarding part: painting. Begin with a dark base coat—black or deep gray works well. This will settle into the crevices and create depth. Once dry, use a dry brushing technique with lighter shades like gray, beige, or even a hint of mossy green. Lightly drag the brush across the surface so the raised areas catch the color, highlighting the texture and giving the illusion of real stone.
Adding Final Details
For added realism, you can apply a thin wash (diluted dark paint) to deepen shadows, or dab on small amounts of green or brown to simulate moss and weathering. If you want a more polished stone look, use smoother brush strokes and slightly lighter tones.
Finishing Touch
Finally, consider sealing your finished piece with a matte varnish. This protects the paint and removes any unwanted shine, keeping the stone effect natural.
I found this creator, and they seem very professional. You can watch their video for inspiration and discover useful ideas that might help you with your own project.
Conclusion
This egg carton method is not only cost-effective but also highly customizable. You can create anything from medieval castle walls to rustic cottage floors. It’s an excellent project for beginners and experienced crafters alike, offering a satisfying way to bring miniature scenes to life with texture and character.